Working Satellites
Amateur radio is a diverse hobby that covers many different areas of interest. Lately, I’ve been exploring the world of satellites and what it takes to communicate with them. Here are some key pieces of information need to work satellites:
- The time the satellite will rise above the horizon. This is called the acquisition of signal (AOS).
- The location or azimuth of where the satellite will come up over the horizon.
- The time the satellite will fall below the horizon. This is called the loss of acquisition of signal (LOS).
- The azimuth of where the satellite will fall below the horizon.
- The time of closest approach (TCA).
- The uplink frequency used to transmit to the satellite.
- The downlink frequency used to receive from the satellite.
- The peak elevation the satellite will reach.
- Understand the terrain. Are there buildings or mountains in the way?
There are various websites and applications available that can provide the information for communicating with satellites. Personally, I rely on Ham Radio Deluxe on my computer and a few mobile apps on my phone. These resources download satellite information, including Kepler data, and present it in user-friendly formats to simplify the process. The following is a representation from Ham Radio Deluxe of the some FM satellites.
Satellite AOS LOS Duration Peak AZ Peak EL
 AO-91       9/14/2019 14:41:08  14:54:14  00:13:06   269.6°    14.6°
 AO-85       9/14/2019 18:44:24  18:57:53  00:13:29   109.6°    18.3°
 SO-50       9/14/2019 20:17:54  20:29:29  00:11:35    42.6°    11.4°
 AO-85       9/14/2019 20:23:29  20:38:48  00:15:19   302.0°    50.6°
 SO-50       9/14/2019 21:57:33  22:12:01  00:14:28    92.0°    89.4°
 AO-92       9/14/2019 22:28:50  22:39:11  00:10:21    70.0°    16.7°
 AO-92       9/15/2019 00:01:55  00:13:00  00:11:05   264.0°    23.7°
 AO-91       9/15/2019 00:57:45  01:08:57  00:11:12    90.0°    13.9°
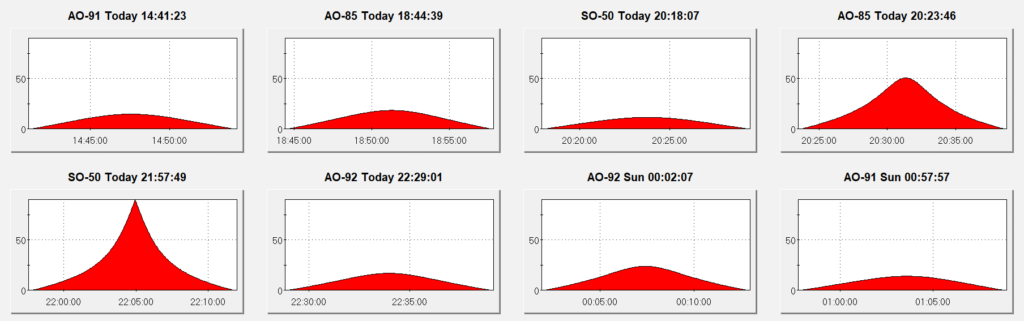
The first figure depicts elevation graphics of the satellites. The higher the pass, the higher the peak on the graph. Ideally, higher passes should result in stronger signals.
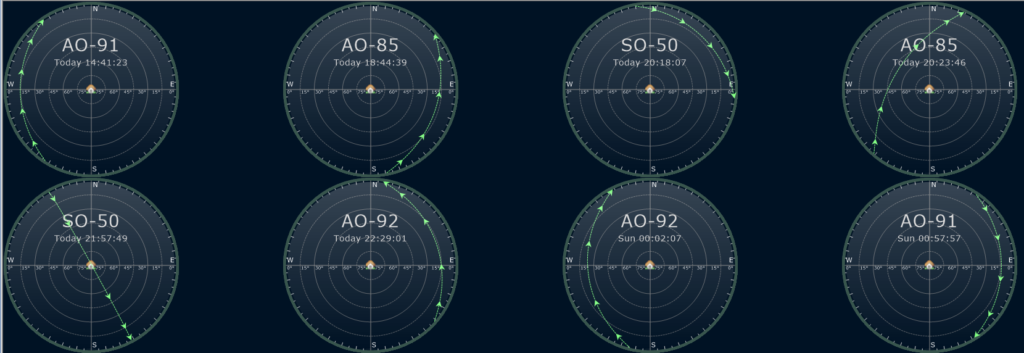
The second figure displays the radar view, which indicates where the satellites will rise above the horizon (acquisition of signal), the path they will take, and where they will fall below the horizon (loss of signal).
The highest point of the pass, also known as the time of closest approach, is where Doppler shift should not be an issue. Visually, it should occur at the halfway point of the pass depicted in the radar view. These satellites typically use 2 and 70 centimeter frequencies. While frequency adjustment isn’t typically necessary on 2 meters, it’s important to make adjustments to account for Doppler shift when operating on the 70 centimeter frequencies.
If your radio is connected to your computer, you can utilize software such as Ham Radio Deluxe to automatically adjust for Doppler shift frequencies. However, since my antenna is handheld, I must be outside to communicate with satellites, and I need to manually adjust for Doppler shift. To simplify this process, a range of frequencies with 5KHz offsets are programmed into memories and are switched between as the satellite passes overhead. Below are the frequencies that I’ve programmed into my radio’s memories for satellite SO-50.
- Memory 1 – 436.805
- Memory 2 – 436.800
- Memory 3 – 436.795 – the downlink frequency -no Doppler shift.
- Memory 4 – 436.790
- Memory 5 – 436.785
As far as I can tell, Ham Radio Deluxe does not provide the frequencies for satellites. I usually get that information from web sites or mobile apps.
When heading outside to communicate with the satellites, determining which direction is North can be done by using a compass or a phone’s compass app. Looking towards the horizon where the acquisition of signal should be, a landmark should be noted. Repeat the process for where the loss of signal will occur. From there, the peak elevation can be estimated, and the expected path of the satellite traced. This should provide a sufficient starting point.
As the satellite approaches, opening the squelch and point the antenna towards where the satellite is expected to rise over the horizon. Listen for changes and adjust the antenna’s position and radio’s frequency as the satellite moves across the sky. At the midpoint of the pass, the frequency on the 70cm band should match the satellite’s frequency. Lastly, it’s important to remember that these satellites rotate, so the antenna may need to be twisted if it isn’t circularly polarized. It will be exciting to see how it goes!